Those who’ve never taken welding classes or fused metal in the field might assume a welder simply sits at a workstation and fuses the metal components in front of them, moving freely around the table and repositioning the workpiece as needed.
But in everyday work environments, joining metal can be much trickier. Workpieces may be attached to the ceiling, the corner, or the floor.
Welders need techniques to be able to weld in any position. So the four common welding positions were developed. Understanding the four basic welding positions can help you choose the right filler metal and welding process for your job. Each welding position may require different techniques, parameters, and preparation to achieve the best results.
Learn more about the different welding positions and get some best practices for welding each type.
What Is a Welding Position?
To help welder understand the type of weld joint (fillet or groove) and the weld position, each weld is given a number and a letter — 1G, 2G, 3G, 4G or 1F, 2F, 3F, 4F — to indicate the position and the type of weld required. Welds with a 1 are flat position, 2 is horizontal, 3 is vertical and 4 is overhead. F stands for fillet weld, while G is a groove weld.
A fillet weld joins together two pieces of metal that are perpendicular or at an angle. A groove weld is made in a groove between workpieces or between workpiece edges. Using this system, a 2G weld is a groove weld in the horizontal position.
Welders are likely to see these designations in a welding procedure specification (WPS). They are also found on filler metal data sheets, which call out the positional capabilities of specific filler metals.
The most ideal welding position for most joints is the flat position because it allows for larger molten weld pools to be controlled. Usually, the larger that a weld pool can be, the faster the joint can be completed.
When welds are made in any position other than the flat position, they are referred to as being done out of position. Some types of grooves work better in out-of-position welding than others; for example, the bevel joint is often the best choice for horizontal butt welding.
MORE: What is Welding?
Different Welding Positions
The American Welding Society (AWS) has divided plate welding into four basic positions for grooves (G) and fillet (F) welds as follows:
- Flat 1G or 1F. When welding is performed from the upper side of the joint and the face of the weld is approximately horizontal.
- Horizontal 2G or 2F. The axis of the weld is approximately horizontal, but the type of the weld dictates the complete definition. For a fillet weld, welding is performed on the upper side of an approximately vertical surface. For a groove weld, the face of the weld lies in an approximately vertical plane.
- Vertical 3G or 3F. The axis of the weld is approximately vertical.
- Overhead 4G or 4F. When welding is performed from the underside of the joint.
A welding position is a technique that allows a welder to join metals in the position in which they are found or the position in which a specific component will be used.
1. Flat welding position
Welding can be done in any position, but it is much simpler when done in a flat position. When you place the workpieces flat on the floor or workbench, the position is referred to as the flat position in welding. It is definitely the easiest position of them all because you are not welding against gravity.
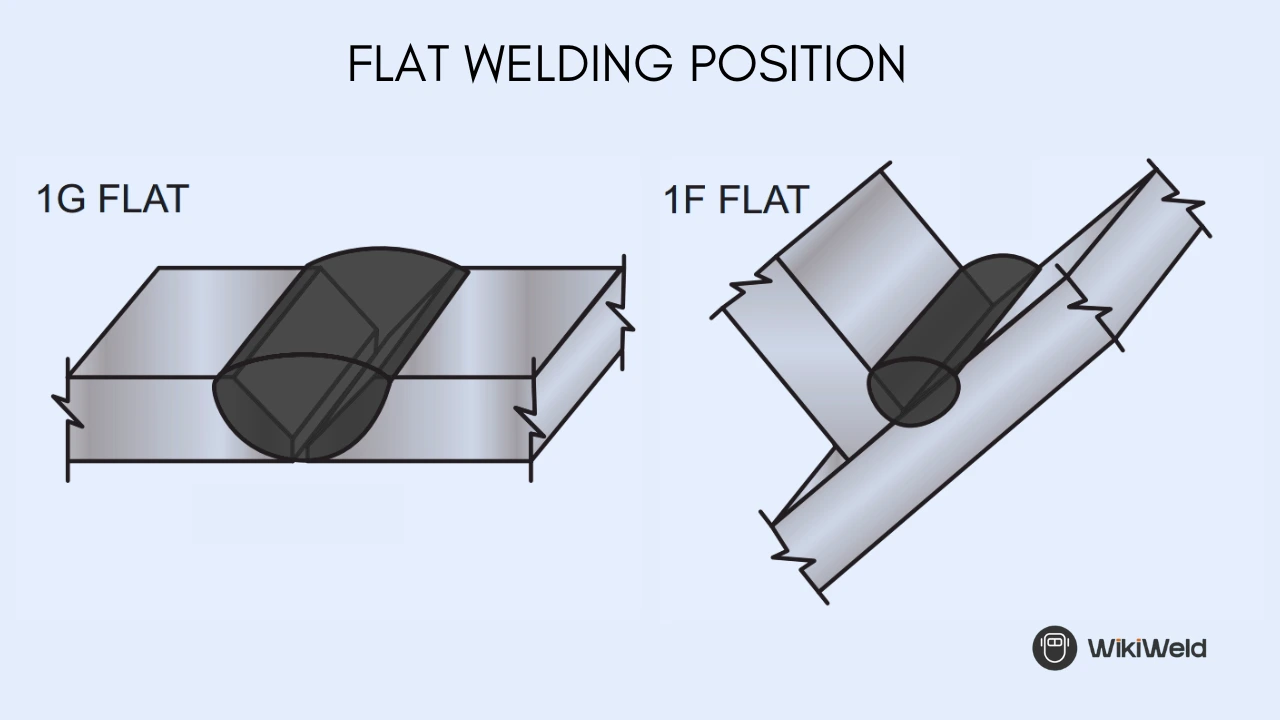
In this position, the work is less tiring, the welding speed is faster, the molten puddle is not as likely to run, and better penetration can be achieved.
You can use any welding process to weld in a flat position. Just be sure to use the recommended techniques for whichever process you’re using. For example, the stick process produces slag, so consider using a drag technique rather than a push technique.
The proper work angle for a flat position weld will change depending on whether the weldment is a 1G or a 1F. If the wire or electrode is off to one side or the other, the heat won’t be focused where the two pieces come together, and you may get incomplete fusion.
2. Horizontal Welding Position
You will discover that it is impossible to weld all pieces in the flat position. Often the work must be done in the horizontal position.
The horizontal position is considered an out-of-position weld. Along with the vertical and overhead, the horizontal position can be more challenging to perform and require a higher level of skill. The horizontal position has two basic forms, depending on whether it is used with a groove weld (2G) or a fillet weld (2F).
For a 2F fillet weld, the welding is done on the upper side of the horizontal and vertical surfaces, and for a 2G groove weld, the welding is done on the vertical plane, and the face of the weld lies on the plane.
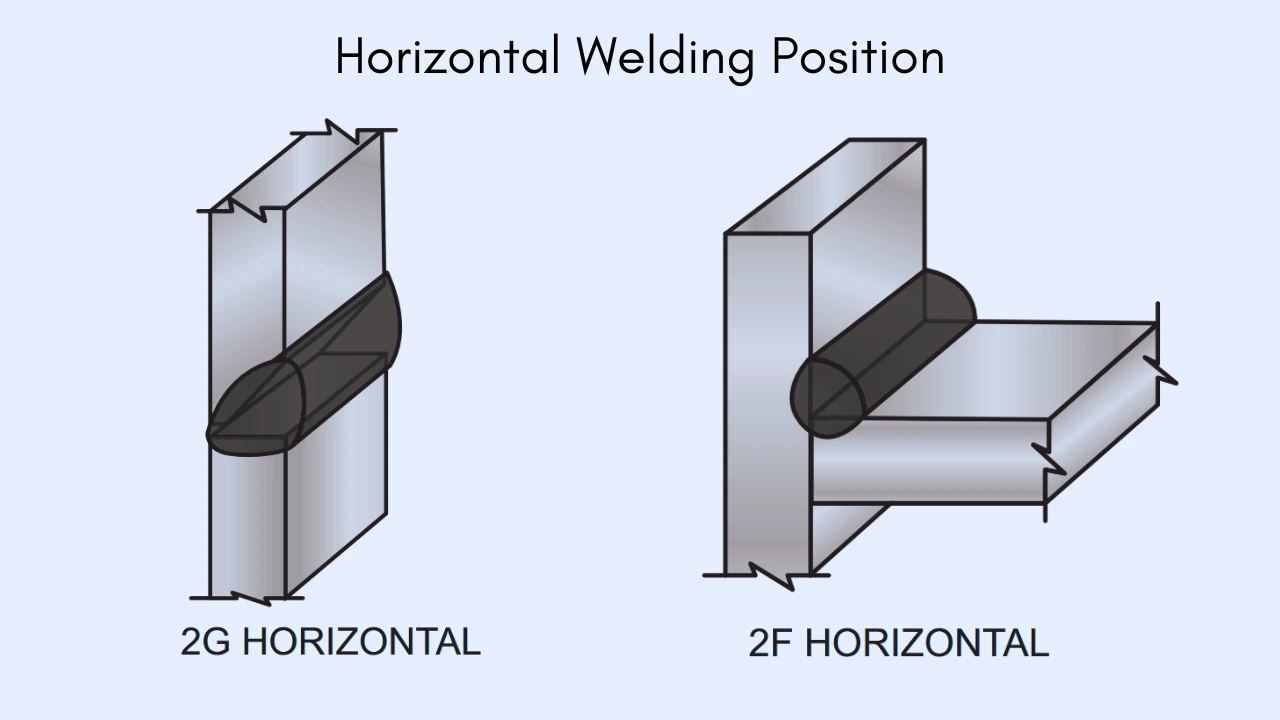
A 2G weld is slightly more challenging than a 2F weld since the weld puddle can sag. Gravity will take over if you run the molten metal too hot horizontally, so ensure the weld puddle is not too fluid. Compared to the flat position, the horizontal position needs more practice to perfect and is considered an out-of-position weld.
The 2F is a fillet weld position, with the torch angled at 45 degrees, and 2G is a groove weld position involving the weld axis in a horizontal plane and the weld face in a perpendicular plane.
An inexperienced welder usually finds the horizontal position of arc welding difficult, at least until he has developed a fair degree of skill in applying the proper technique. The primary difficulty is that in this position you have no “shoulder” of previously deposited weld metal to hold the molten metal.
3. Vertical Welding Position
A vertical weld is a weld that is applied to a vertical surface or one that is inclined 45 degrees or less. Erecting structures, such as buildings, pontoons, tanks, and pipelines, require welding in this position. Welding on a vertical surface is much more difficult than welding in a flat or horizontal position due to the force of gravity; gravity pulls the molten metal down.
Vertical welding is done in either an upward or downward position. The terms used for the direction of welding are vertical up or vertical down. Vertical down welding is suited for welding light gauge metal because the penetration is shallow and diminishes the possibility of burning through the metal. Furthermore, vertical down welding is faster, which is very important in production work.
Adjust the weld parameters to achieve the best results in vertical welds. Use a reduced wire feed speed and voltage to ensure the puddle does not fall out of the joint. If you’re using a welding power source with Auto-Set™ technology, be sure to use the parameters designed for thinner material, even if you’re welding thicker base metal. This helps keep the heat input lower to fight gravity.

Use a 90-degree travel angle for a 3G weld, and a 45-degree angle for a 3F weld.
Slowly manipulate the puddle in a way that washes it to each edge of the joint. Going straight up with a vertical weld will typically result in a ropey bead that doesn’t wash into the edges well. Instead, hold the toes of the weld longer and quickly move across the middle of the puddle as you travel up.
Welders can use several common techniques for this puddle manipulation — including a zigzag motion, an upside-down T, or repeated triangles stacked on top of each other — depending on the operator’s preference.
In vertical welding, it’s important to make sure you’re in a comfortable position before starting to weld. Practice first on scrap material to make sure the parameters and technique you’re using produce the results you want. That way you can make adjustments before welding your workpiece.
4. Overhead Welding Position
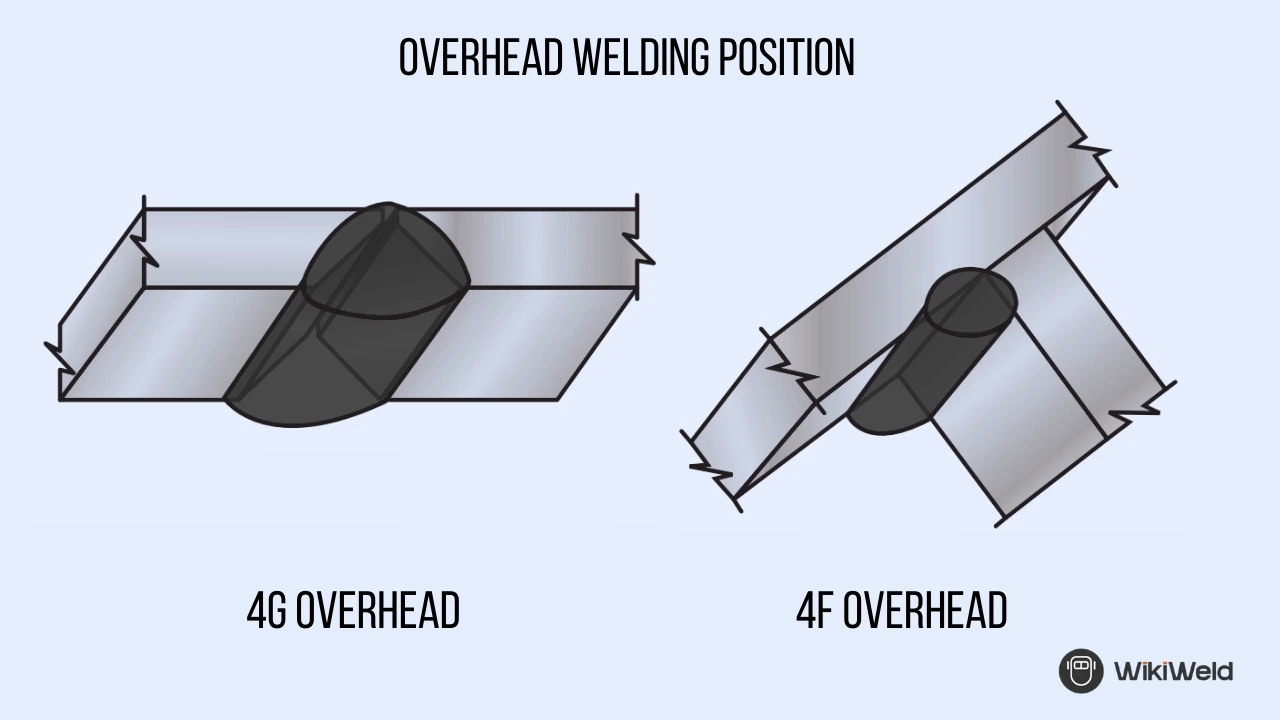
Overhead welding is the most difficult position in welding. Not only do you have to contend with the force of gravity, but the majority of the time you also have to assume an awkward stance. Nevertheless, with practice, it is possible to make welds equal to those made in the other positions.
To retain complete control of the molten puddle, use a very short arc and reduce the amperage as recommended. As in the vertical position of welding, gravity causes the molten metal to drop or sag from the plate.
When too long an arc is held, the transfer of metal from the gun to the base metal becomes increasingly difficult, increasing the chances of large globules of molten metal dropping from the gun.
When you routinely shorten and lengthen the arc, dropping molten metal can be prevented; however, you will defeat your purpose should you carry too large a pool of molten metal in the weld.
One of the problems encountered in overhead welding is the weight of the cable. To reduce arm and wrist fatigue, drape the cable over your shoulder when welding in the standing position. When sitting, place the cable over your knee. With experience, cable placement will become second nature.
The challenging overhead position is performed with the torch at a 45-degree angle, and the 4G and 4F welding positions are appropriate for groove and fillet welds.
When welding in an overhead position the sparks dropdown. Make sure you have extra protection such as a bandana under your welding helmet. Stick welding produces more sparks and splatter. Using a full leather welding jacket offers protection from sparks and splatter.
Pipe Welding Positions
The American Welding Society has divided pipe welding into five basic positions:
- Horizontal rolled 1G. The pipe is rolled either continuously or intermittently so that the weld is performed within 0° to 15° of the top of the pipe.
- Horizontal fixed 5G. The pipe is parallel to the horizon, and the weld is made vertically around the pipe.
- Vertical 2G. The pipe is vertical to the horizon, and the weld is made horizontally around the pipe.
- Inclined 6G. The pipe is fixed at a 45° inclined angle, and the weld is made around the pipe.
- Inclined with a restriction ring 6GR. The pipe is fixed at a 45° inclined angle, and there is a restricting ring placed around the pipe below the weld groove.

5G Welding Position
The 5g position welding is a situation where the pipe is in the horizontal or X-axis position, but the pipe is stationary or cannot be rotated. The welder performs the welding while moving it around the pipe. This situation is almost the same as the 1G situation; only the pipe cannot be rotated.
It is also called PF in ISO/EN standards. Welding in 5G is done vertically, either upwards or downwards.
6G Welding Positions
This is one of the hardest types of welding positions for welders to perform. The position is a pre-condition for getting certified. To some extent, this position is similar to 5G/PH/PJ but the pipe stands at 45° to the other one. Other names are 6G Uphill/H-L045 and 6G Downhill/J-L045 Position.
6G welding position also known as overhead weld position or welder certification test position. In this position, one pipe needs to be positioned at a 45° angle to the other one. That’s why it has become the most complex and challenging position for welders. Further, welders need to make many body positions while performing welding.
While 6G position welding, there are mainly three welds i.e., horizontal (difficult), flat (easy), and vertical welds (demanding). Filling metal flow downwards is the main cause of the difficulty. And in a vertical position, it becomes more difficult for welders as it is overhead welding.
Therefore, a welder needs a lot of practice in a 6G position before going for the actual weld. A certified welder rarely faces a 6G position while working in the industry during their service, but it is a common pre-employment test for them.
The main use of a 6G weld position is for fabrication and installation of pipe and pipelines mostly in chemical plants, oil and gas plants, industrial plants, and any other similar industry using pipe and pipelines.
Conclusion
When you start working on a welding position, it is always a good idea to perform a few practice passes before welding to ensure you complete the entire weld length in a comfortable position. Being in a comfortable position is pertinent to achieving a consistent weld.
The filler metal you choose, and the mode of transfer determine the welding position you should go for. If you want to weld overhead, then make sure the filler metal is capable of it and adjust your welding parameters to help optimize the overhead welding position.
FAQs
What are the 4 types of welding position?
1. Flat
2. Horizontal
3. Vertical
4. Overhead
What is the 6 position of welding?
6G Welding Position: One of the most challenging welding positions, 6G is similar to 5G, but the pipe is positioned at 45° to the other. The 6G position requires three welds: horizontal, flat, and vertical.
What welding position pays the most?
Here are the current top 5 highest-paying welding jobs.
1. Rig Welder. Annual Salary: $52,000 – $207,000.
2. Underwater Welder. Annual Salary: $38,000 – $147,000.
3. Nuclear Welder. Annual Salary: $22,000 – $143,500.
4. Industrial Pipeline Welder. Annual Salary: $23,500 – $133,500.
5. Military Support Welders. Annual Salary: $37,000 – $160,000.
What is the hardest welding job?
1. Underwater Welding.
2. Oil and Gas Industry Welding.
3. Structural Steel Welding.
4. Shipyard Welding.
5. Aerospace Welding.
6. Nuclear Power Plant Welding.
7. High-Pressure Vessel Welding.
8. Pipeline Welding.
What is the toughest welding position?
Welding in the vertical position is more challenging and can be more dangerous than welding in the flat or horizontal position.
What is the easiest position to weld?
Flat Welding Position
Also known as the down-hand position, the flat position is the easiest of all the welding positions. A flat position is the common type of weld. It is the first weld that beginners learn. In this position, you are not welding against gravity.