Oxyacetylene and oxyhydrogen welding processes are most commonly used for gas welding aluminum and aluminum alloys. Hydrogen can be combusted with oxygen using the same tips as acetylene. However, the temperature is lower, and larger tip sizes are required.
When acetylene and oxygen are mixed in the correct proportions and ignited, the resulting flame reaches a temperature of 6300 degrees F (3482 degrees C). This is intense enough to melt all commercial metals so completely that metals to be joined actually flow together to form a complete bond of mechanical pressure or hammering.
Except on a very thin material, extra metal in the form of a wire rod is usually added to the molten metal in order to strengthen the seam slightly. If the weld is performed correctly, the section where the bond is made will be as strong as the base metal itself.
Metal which can be welded with oxy-acetylene flame include iron, steel, cast iron, copper, brass, aluminum, bronze as well as many alloys may be welded. The oxy-acetylene flame is also used for cutting metal, case hardening, and annealing.
Weld Preparation & Treatments
Cleaning The Base Metal Before Welding
Good cleaning practices are always important when welding aluminum. The level of cleanliness and metal preparation required for welding depends on the level of quality desired in the welds. Suitable preparation prior to welding is important when fabrications are required to meet the weld quality requirements of manufacturing codes such as AWS D1.2.
High-quality welds are far more difficult to achieve in aluminum than in steel. Aluminum has a much greater potential to develop quality problems such as lack of fusion, lack of penetration, and porosity, than does steel.
The tough oxide surface film on aluminum can create a lack of fusion problems and must be controlled. The high thermal conductivity of aluminum can create a lack of penetration problems. The high solubility of hydrogen in molten aluminum can create porosity problems and requires that all moisture and hydrocarbons be eliminated before welding.
The thickness of the oxide film on aluminum must be controlled and prevented from hydrating due to the presence of excessive moisture.
Metal Storage and Weld Joint Preparation – Do’s and Don’ts
Storage
- Store all welding wire and base metal in a dry location with a minimum temperature fluctuation.
- Welding wire should preferably be stored in a dry heated room or cabinet.
- Store metal vertically to minimize moisture condensation and absorption of water contamination
- between layers.
- Bring all filler and base metal materials into the welding area 24 hours prior to welding to allow them
- to come to room temperature.
- Keep welding wire covered at all times.
Joint Preparation
- Don’t use methods that leave a ground or smeared surface. For example, a circular sawed surface is
- weldable while a band sawed surface leaves a smeared surface that may result in lack of fusion and
- should be filed to remove smeared metal prior to welding. Using a coarse disc grinder is preferable to a
- wheel grinder, however, if possible avoid the use of any type of grinder.
- Don’t use any lubricants in the joint preparation metal working process, if possible.
- Don’t use chlorinated solvents in the welding area because they may form toxic gases in the presence
- of electric welding arcs.
- Don’t use oxyfuel gas cutting, carbon arc cutting or gouging processes, or oxyfuel flames to preheat.
- These processes damage the heat-affected area and promote the growth and hydration of the oxide film
- present on the surface.
- Use plasma arc cutting & gouging and laser cutting.
- Mechanically remove the plasma arc and laser cut edges from 2xxx, 6xxx, and 7xxx series alloys. The
- melted edges of these alloys will contain detrimental solidification cracks and heat-affected zone
- conditions. Remove a minimum of 1/8 inch of metal from the cut edge. Use mechanical metal removal
- methods that cut and remove metal chips.
- Prepare and clean the joint prior to assembly. Degrease the surfaces with a solvent.
- Use clean cloth such as cheesecloth or paper towels to solvent clean and dry a welding joint.
- Don’t use shop rags to clean welding joints and do not use compressed air to blow off the joint.
- Compressed air contains moisture and oil contaminants.
- Stainless steel wire brushes the joint only after solvent cleaning. Wire brushing prior to cleaning embeds
- hydrocarbons and other contaminates in the metal surface.
- Stainless steel wire brush all metal that has been etched. The by-product residuals from etching must
- be removed prior to welding.
- Clean all wire brushes and cutting tools frequently.
Weld Backing
Temporary backing strips are usually made from copper, anodized aluminum, stainless steel, or various ceramic materials. They are used to control penetration and are removed after welding. Care must be taken to prevent melting the backing material into the weld puddle.
Permanent backing strips are always made from the same alloy as the base metal being welded. Refer to AWS D1.2 for backing strip removal requirements. Typically, no root opening is used when using temporary backing material. A root opening is typically used when using permanent backing material.
Preheating And Inter-Pass Temperatures
Preheating can be used to reduce the thermal effects of section size when welding base metals of dissimilar thicknesses. Heat-treatable base metals and 5xxx base metals containing more than 3% Mg should not be subjected to preheating and inter-pass temperatures above 250° F (121° C) for more than 15 minutes. Refer to AWS D1.2.
Post-Weld Heat Treatment and Age
When heat-treatable aluminum alloys are welded, they lose a significant amount of their mechanical properties in the heat-affected zone. If the base metal being welded is in the -T4 temper, much of the original strength can be recovered after welding by post-weld aging.
If the base metal is welded in the -T6 temper it can be solution heat-treated and aged after welding which will restore it to the -T6 temper. Depending on which filler metal is used for welding, post-weld heat treatment, and aging may cause problems.
If the filler metal does not respond to heat treatment and aging the same way as the base metal, the weld joint may exhibit mechanical properties below those of the base metal. Due to stress concentrations in the weld itself, this is not a desirable condition.
Therefore, if post-weld heat treatment and aging are performed, the filler metal selected is critical. Contact Hobart and get metallurgical advice on which filler metals are best suited for your application.
Aluminum Gas Welding Process
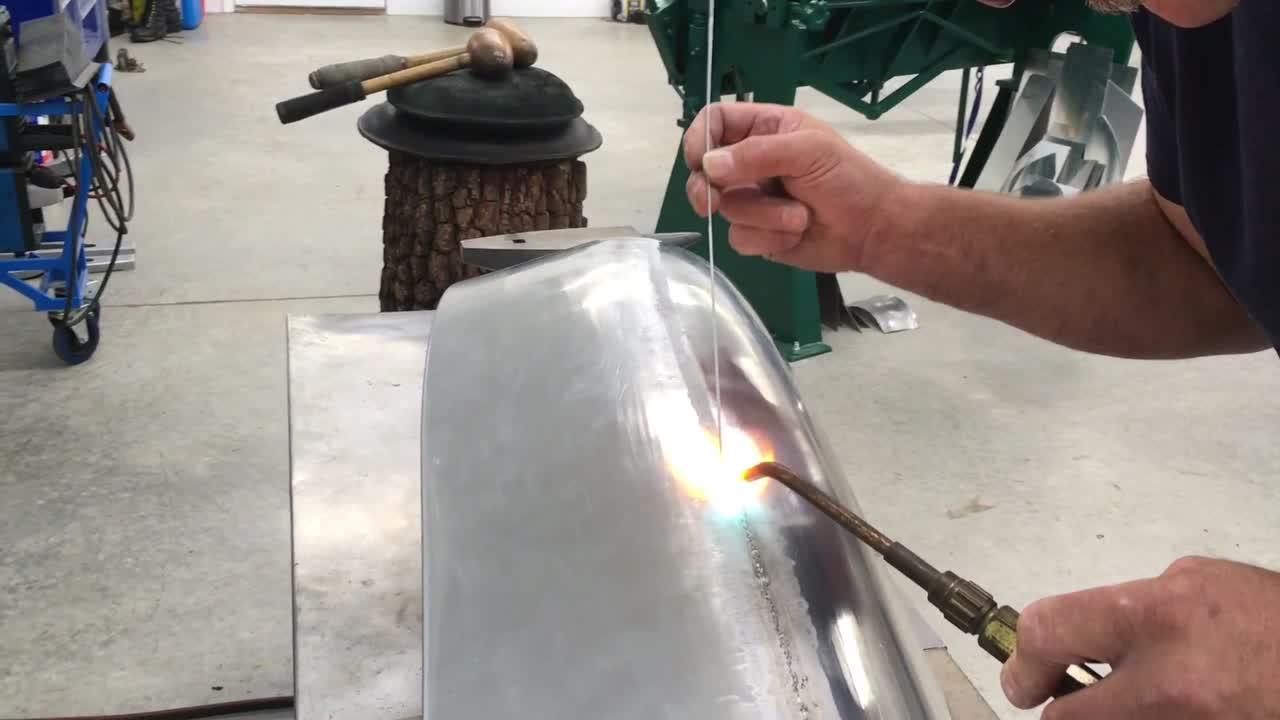
After the material to be welded has been properly prepared, fluxed, and preheated, the flame is passed in small circles over the starting point until the flux melts. The filler should be scraped across the surface of the toe at three or four-second intervals, allowing the filler rod to come out of the flame each time.
The scraping motion indicates when to start welding without overheating the aluminum. The base metal must be melted before the filler rod is applied. Forehand welding is generally considered best for welding aluminum because the flame preheats the area to be welded. When welding thin aluminum there is little need for torch movement other than advancing.
For material 3/16 in. (4.8 mm) thick and thicker, the torch should be given smooth lateral movement. This distributes the weld metal over the entire width of the weld. A gentle back-and-forth motion will aid the flux in removing oxide.
The welding rod should be periodically dipped into the weld puddle and pulled out of the puddle with a forward motion. This stripping process closes the puddle, prevents porosity, and assists the flux in removing the oxide film.
WELDING RULES
Note: The following procedure is for oxyacetylene, because of the more technical nature and varied availability of hydrogen.
The rules are simple. Follow them or fail!
- Open the oxygen bottle fully to seat the upper packing, then just crack the acetylene. Set regulators to equal pressures, from 2 to 5 pounds each, with smaller tips needing lower pressures.
- Choose a torch tip one size larger than would be used on steel, i.e. If choosing a 00 (double ought) tip for a .040 steel sheet, then move up to a 0 tip for a .040 aluminum sheet.
- If oily, clean the material with solvent, or lacquer thinner. or alcohol. Scrub with a stainless brush on both sides just prior to welding.
- Flux either the rod (or wire), or the part — or, in extreme cases, both. The flux will be a white powder which will be mixed 1/3 with either 2/3 water or alcohol.
- Safety precautions such as eye protection, adequate ventilation, and keeping one’s head out of the fumes, are recommended.
- Choose the proper filler metal for the alloy to be welded. Common weldable aircraft alloy sheet metals.
Hollow, flux-filled rod, was made available years ago, but aside from the questionable alloy, it had the persistent bad habit of neatly dividing itself, building up the edges of the joint without joining them together.
FAQs
What gas do you use to weld aluminum?
The gas for aluminium welding can be argon or helium. These two gases are used pure or mixed. Pure argon is the most popular.
Can you weld aluminum with oxy fuel?
Metal which can be welded with oxy-acetylene flame include iron, steel, cast iron, copper, brass, aluminum, bronze as well as many alloys may be welded. The oxy-acetylene flame is also used for cutting metal, case hardening and annealing.
Can we do gas welding on aluminium?
The gas for aluminium welding can be argon or helium. These two gases are used pure or mixed. Pure argon is the most popular. However, the ionization potential and thermal conductivity of helium are much higher than for argon.
What is the process of welding aluminium gas?
The first step to gas weld aluminum is cracking the oxide layer. The oxide layer has a melting temp of 3722°F (2050°C) and the aluminum on its own melts around 1221°F (660°C), so you must apply a gas welding temp that is 3X hotter than the aluminum can withstand to bust through the oxide layer.
Do you need 100% argon to weld aluminum?
The most common gas used for MIG welding aluminum is 100% argon. This gas allows you to get into a spray transfer or pulsed spray transfer mode easily for aluminum due to its low ionization value. Another benefit of 100% argon gas is that it can also be used for TIG welding aluminum.
Do you need flux to gas weld aluminum?
This involves using a Flux to break down the Aluminium Oxide and prevent it from reforming during the welding process. Oxy/Acetylene equipment needs to be used (not Oxy/Propane or Propylene).